Lamination Sheet for Plywood: Application Guide
Step-by-step guide to applying lamination sheet on plywood. Learn surface preparation, adhesive selection & professional finishing tips.
Quick Answer
Applying a lamination sheet on plywood involves cleaning and sanding the plywood surface, choosing the correct adhesive type (contact adhesive, PVA, or waterproof variants), applying glue uniformly on both surfaces, positioning the laminate carefully from one edge, pressing firmly to remove air bubbles, and allowing adequate curing time under pressure. A well-executed lamination process results in a durable, professional finish that resists moisture and wear for years.
At a Glance
- Surface preparation—sanding and cleaning—is the single most critical step for bubble-free laminate bonding
- Apply adhesive first on the laminate (non-porous surface), then on plywood (porous surface), for stronger bonding
- Use a plastic notched spreader or roller—never brushes or wooden sticks—for even glue distribution
- Allow 16–24 hours of pressing with evenly distributed weight (100–210 kg) on horizontal surfaces
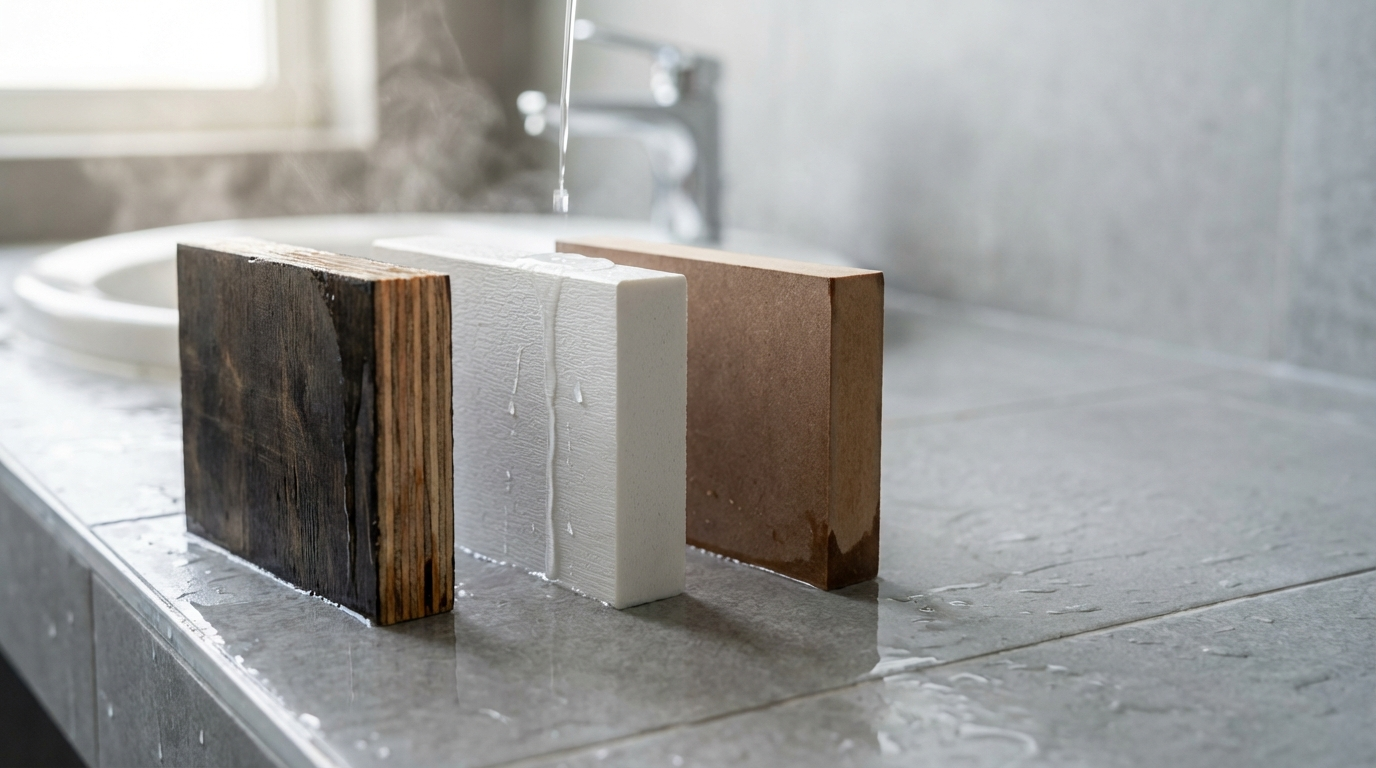
- Monsoon and high-humidity conditions require extra precautions to prevent laminate expansion and bubbling
- Always apply a backing laminate or balance sheet on the reverse side to prevent warping
Lamination Sheet for Plywood Explained
A lamination sheet—commonly known as sunmica, HPL (High-Pressure Laminate), or decorative laminate—is a thin, rigid surface material used to finish plywood surfaces for furniture, cabinetry, wall panels, and countertops. These sheets are created by bonding multiple layers of kraft paper saturated with resin under heat and pressure, topped with a decorative printed layer and protective overlay.
The purpose of applying a lamination sheet on plywood is multifold: it protects the plywood substrate from moisture, scratches, and wear; provides an aesthetically appealing surface finish; and significantly extends the usable life of the furniture. In the Indian context, where humidity fluctuations between monsoon and dry seasons are extreme, proper lamination is not just cosmetic—it's structural insurance against premature furniture failure.
The core mechanism is adhesive bonding. Unlike factory-pressed prelam boards where laminate is fused under industrial pressure, site-applied lamination relies on contact adhesives or PVA-based glues to create a permanent bond between the laminate back and the plywood surface. The bond quality depends entirely on surface preparation, adhesive selection, application technique, and curing conditions.
In India, the carpentry trade commonly refers to this process as "sunmica pasting" or "mica fitting," though technically sunmica is a brand name that became genericized. Whether you're using HPL, LPL, acrylic laminate, or PVC laminate, the fundamental application principles remain similar—though each material type has specific adhesive compatibility requirements that must be followed.
Types of Lamination Sheets Used on Plywood
Understanding the different laminate types helps in selecting the right adhesive and application method. Each category has distinct performance characteristics and installation requirements.
High-Pressure Laminate (HPL)
HPL is manufactured by compressing six to eight layers of resin-impregnated kraft paper with a decorative layer under pressures exceeding 1,000 PSI. This produces a dense, rigid sheet typically 0.8mm to 1.5mm thick. HPL offers superior scratch resistance, heat tolerance, and impact durability, making it ideal for high-traffic applications like kitchen countertops, office furniture, and commercial interiors. Standard HPL requires contact adhesive for bonding and needs proper pressure application during curing.
Low-Pressure Laminate (LPL) / Thermally Fused Laminate (TFL)
LPL is fused directly onto particleboard or MDF substrates during manufacturing—it cannot be site-applied onto raw plywood. However, understanding LPL helps buyers recognize prelam boards versus site-laminated panels. LPL is thinner and less impact-resistant than HPL but costs less and works well for vertical surfaces like wardrobe shutters and cabinet interiors where heavy wear is not expected.
Acrylic Laminate
Acrylic laminates offer a high-gloss, mirror-like finish that creates a premium contemporary look. They are thicker than standard HPL (typically 1mm to 1.2mm) and require specialized adhesives designed for non-porous surfaces. Acrylic laminates are popular for modular kitchen shutters in metros but require skilled application to avoid visible bubbles or uneven finishes.
PVC Laminate
PVC laminates are flexible sheets often used for wrapping edges, curved profiles, and surfaces where bendability is required. They offer excellent moisture resistance and are commonly applied using spray adhesives or dedicated PVC bonding compounds. PVC laminate is popular for membrane press applications in modular furniture factories.
Compact Laminate
Compact laminates are extra-thick, self-supporting HPL panels (typically 3mm to 25mm thick) that don't require a substrate. They're used for toilet partitions, locker systems, and external cladding rather than plywood surfacing. These are mentioned for completeness, as buyers sometimes confuse them with standard decorative laminates.
Comparison Table: Laminate Types for Plywood Application
| Laminate Type | Typical Thickness | Primary Adhesive | Best Application | Price Range (₹/sq ft) | Skill Level Required |
|---|---|---|---|---|---|
| HPL (Standard) | 0.8mm – 1.0mm | Contact Adhesive / PVA | Furniture, Cabinets, Countertops | ₹30 – ₹80 | Moderate |
| HPL (Postforming) | 0.8mm – 1.0mm | Heat + Contact Adhesive | Curved Edges, Bullnose Profiles | ₹50 – ₹120 | High |
| Acrylic Laminate | 1.0mm – 1.2mm | Acrylic-specific Adhesive | High-gloss Kitchen Shutters | ₹70 – ₹150 | High |
| PVC Laminate | 0.35mm – 0.5mm | Spray / PVC Adhesive | Edge Wrapping, Curved Surfaces | ₹45 – ₹110 | Moderate |
| Exterior HPL | 6mm – 8mm | Mechanical + Adhesive | Facades, Outdoor Cladding | ₹150 – ₹350 | Professional Only |
Step-by-Step Guide: Applying Lamination Sheet on Plywood
This section covers the complete process from surface preparation to final finishing. Following these steps systematically prevents common failures like bubbling, edge lifting, and premature delamination.
Step 1: Surface Preparation
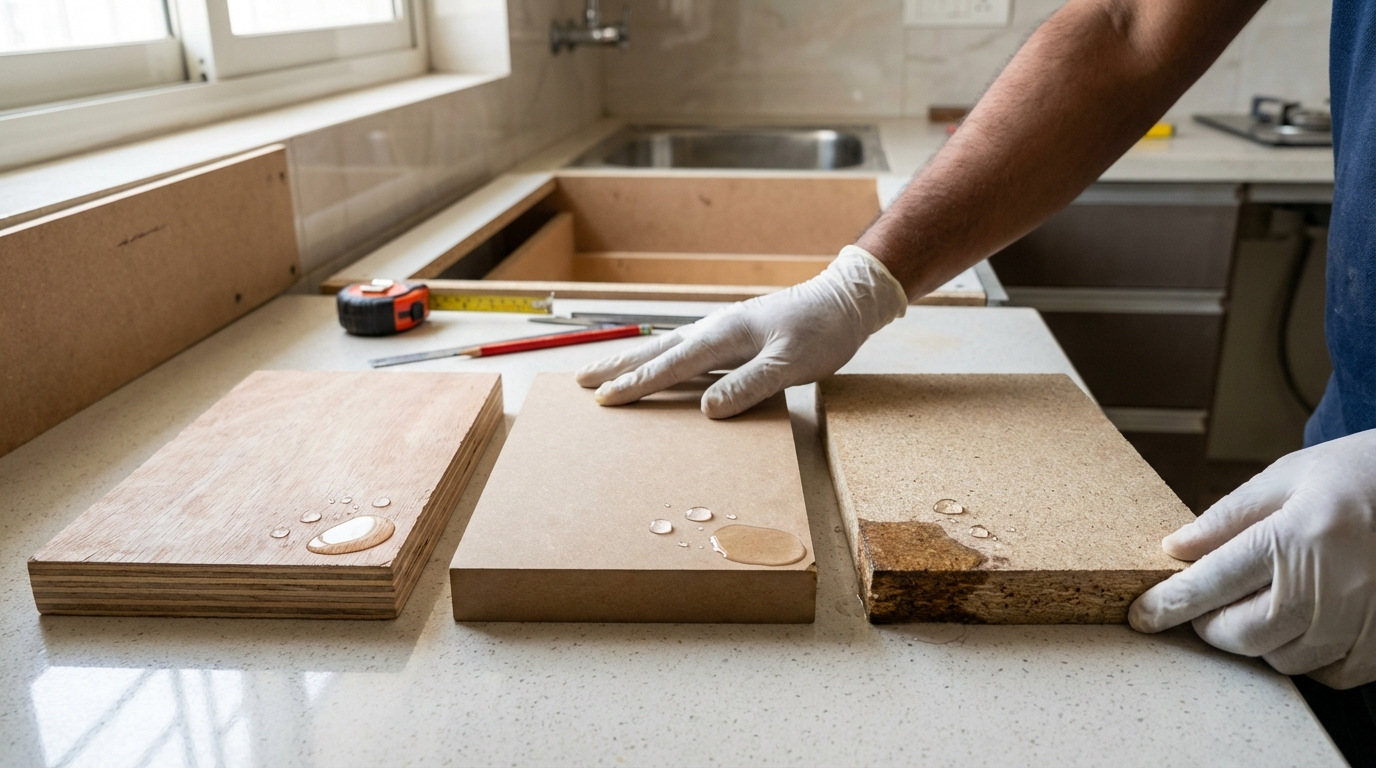
Surface preparation determines 70% of the final bond quality. Begin by sanding the plywood surface with 80-grit sandpaper to remove any mill glaze, dust, or surface impurities. The goal is to create a slightly textured surface that allows adhesive penetration. After sanding, wipe the surface with a dry cloth to remove all dust particles—any debris trapped under the laminate will show through as bumps.
For plywood that has been stored in humid conditions (common during monsoon in coastal cities like Mumbai, Chennai, or Kolkata), allow the boards to acclimatize in a dry indoor environment for 48–72 hours before lamination. Moisture trapped in plywood can cause steam blisters during curing.
Step 2: Laminate Sheet Preparation
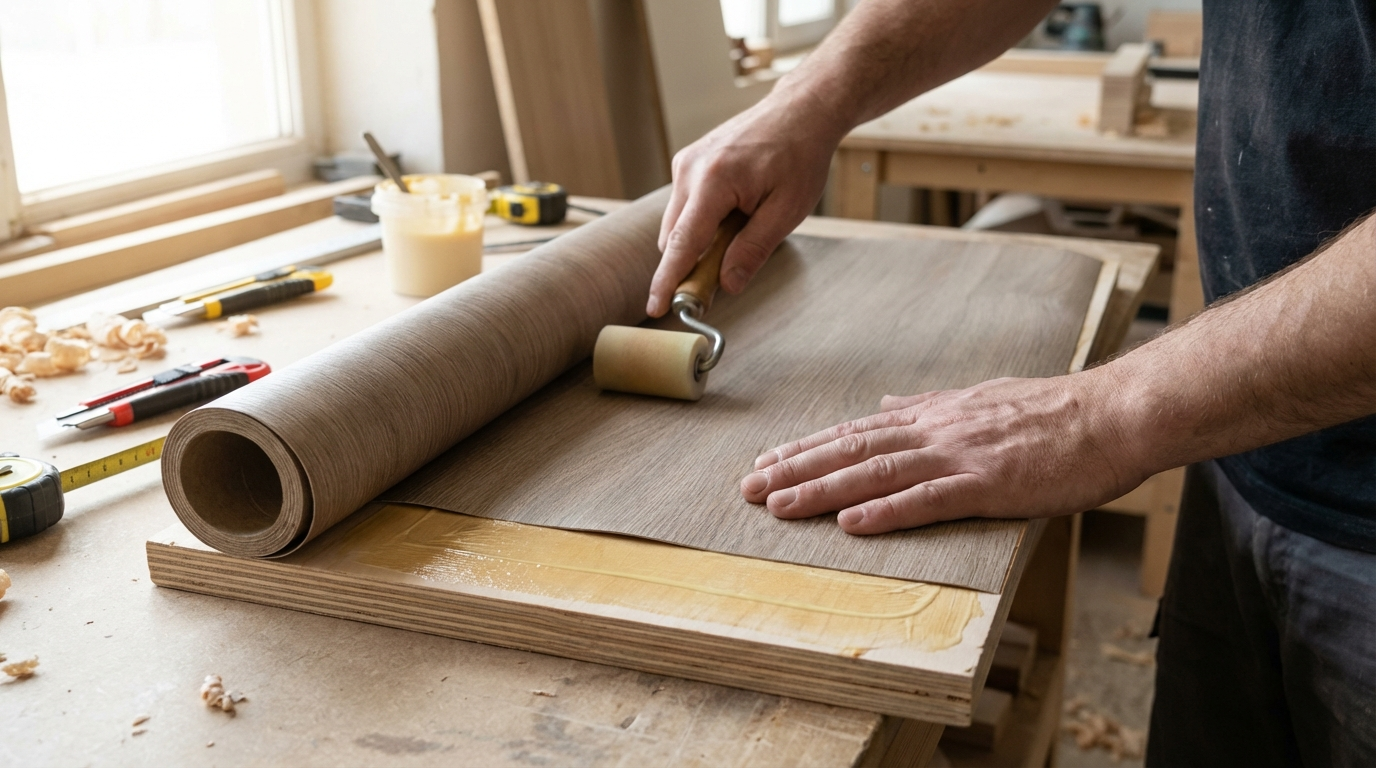
Cut the laminate sheet slightly larger than the plywood panel—typically 10–15mm overhang on all sides. This allowance accommodates minor positioning errors and will be trimmed after bonding. Use a circular saw with a fine-tooth blade or a laminate scorer for cutting. Always cut with the decorative face down to prevent chipping.
Lightly sand the back (non-decorative side) of the laminate with fine-grit sandpaper to improve adhesive grip. Clean off any sanding dust with a dry cloth.
Step 3: Adhesive Selection and Preparation
For standard HPL applications on interior furniture, solvent-based contact adhesive remains the industry standard in India due to its forgiving working time and strong bond. Waterproof (BWP-grade) PVA adhesives are preferred for kitchen cabinets or bathroom vanities where moisture exposure is expected.
Before application, stir the adhesive thoroughly using a clean wooden stick or metal rod to ensure uniform consistency. Separated or clumpy adhesive will result in uneven bonding.
Step 4: Adhesive Application
Apply adhesive in the correct sequence: first coat the laminate back (non-porous surface), then coat the plywood surface (porous surface). This sequence ensures optimal adhesive penetration and bonding. Use a plastic notched spreader or rubber roller for application—never use brushes, laminate scraps, or wooden sticks, as these create uneven glue distribution.
Apply a uniform, thin layer covering the entire surface. Excessive glue causes seepage at edges and extends drying time; insufficient glue creates weak spots that lead to delamination. Coverage typically ranges from 34–36 sq ft per kg for quality adhesives.
Step 5: Drying / Open Time
Allow both glued surfaces to dry until tacky but not wet—this "open time" is critical for contact adhesives. In typical Indian indoor conditions (25–35°C), this takes 15–30 minutes. In humid monsoon conditions, extend drying time by 10–15 minutes. The surfaces should not feel wet when touched with the back of your knuckle but should still feel slightly sticky.
Step 6: Positioning and Initial Bonding
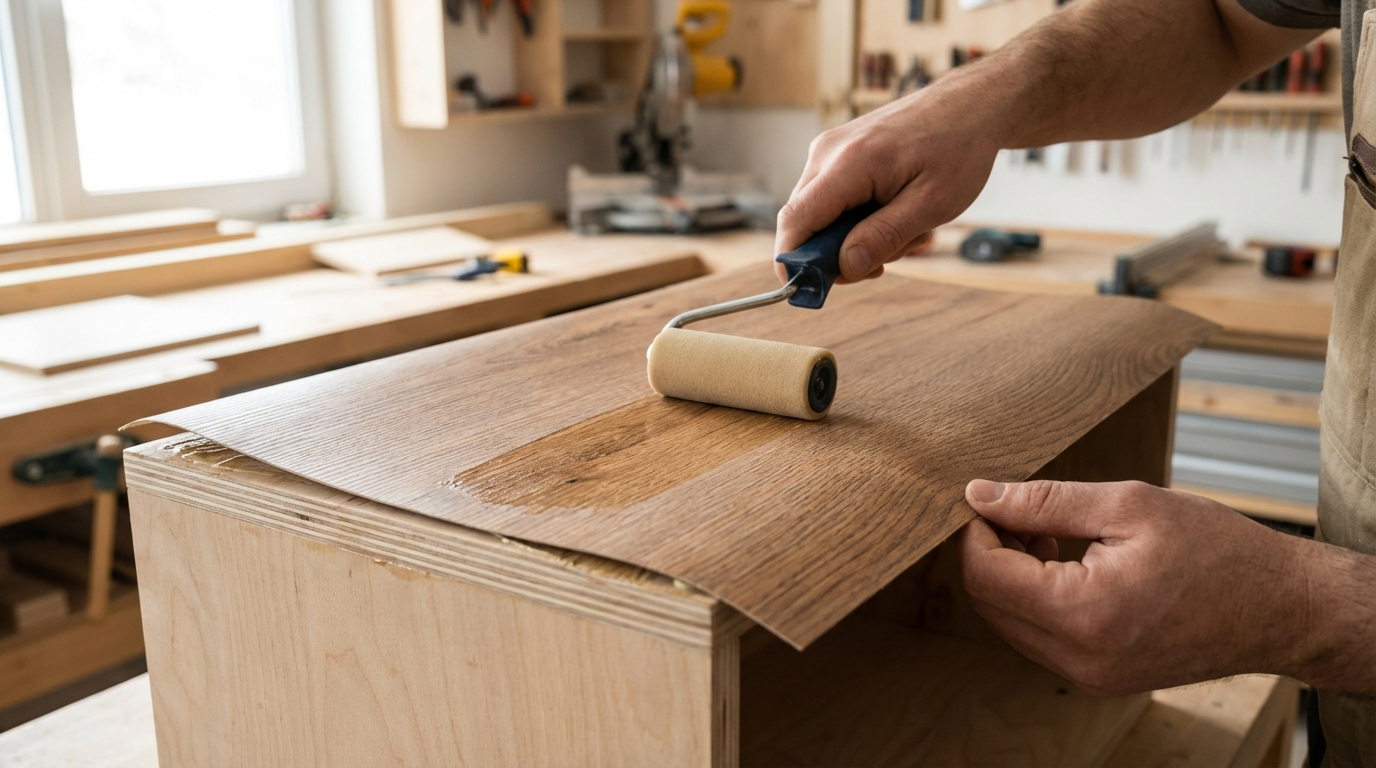
Positioning requires care because contact adhesive bonds instantly on contact—you get one chance. Place two thin wooden dowels or strips across the plywood surface to keep the laminate separated while positioning. Align the laminate sheet carefully, then remove the dowels one at a time from one edge, pressing the laminate down progressively to avoid trapping air.
Start pressing from one edge and work toward the opposite side in a sweeping motion—never drop the entire laminate flat at once, as this traps air bubbles.
Step 7: Pressing and Bubble Removal
After initial placement, press the entire surface firmly using a wet cloth, working from the center outward to push any trapped air toward the edges. Use a J-roller or laminate roller for even pressure distribution. Check for air pockets by tapping the surface—hollow sounds indicate unbonded areas.
For horizontal surfaces like tabletops, apply sustained pressure for 16–24 hours using stacked plywood sheets and weights (100–210 kg evenly distributed). For vertical cabinet panels, press with a wet cloth for 5–10 minutes and apply masking tape at 2-inch intervals along edges to hold the laminate during curing.
Step 8: Edge Trimming and Finishing
After the adhesive has fully cured (typically 24–48 hours depending on climate), trim the overhanging laminate using a laminate trimmer or sharp utility knife. Work slowly to avoid chipping. Sand the trimmed edges lightly with fine-grit sandpaper to smooth any roughness, then apply edge banding or matching edge laminate for a finished look.
How to Choose the Right Adhesive for Lamination
Adhesive selection depends on the laminate type, substrate, application environment, and desired bond permanence. Mismatched adhesive-laminate combinations are a leading cause of site lamination failures.
Contact Adhesives (Solvent-Based)
Solvent-based contact adhesives are the workhorses of Indian carpentry shops. They bond instantly on contact, work well across a range of temperatures, and don't introduce moisture into the substrate. The downside is solvent fumes (ventilation required) and flammability during application. Best for general furniture HPL application where BWP resistance isn't critical.
Water-Based Contact Adhesives
Eco-friendly alternatives with lower fumes, but they introduce moisture into the substrate, which can cause dimensional changes if the plywood isn't properly acclimatized. Not suitable for bonding laminate to steel or non-porous metal surfaces. Drying time is longer than solvent-based options.
PVA (Polyvinyl Acetate) Adhesives
Standard carpenter's glue—economical and easy to use but not moisture-resistant. Suitable for interior applications where water exposure is minimal. Not recommended for kitchen sink cabinets or bathroom vanities without additional waterproofing measures.
Waterproof / BWP-Grade Adhesives
Specifically formulated for humid environments and wet areas. These adhesives maintain bond integrity even with direct water exposure. Essential for kitchen base cabinets, bathroom furniture, and coastal climate installations. Higher cost but mandatory for moisture-prone applications.
Buyer Checklist for Adhesive Selection
- Verify adhesive compatibility with your specific laminate type (HPL, acrylic, PVC)
- Check coverage rate (sq ft per kg) to estimate quantity needed
- Confirm open time suits your working speed and climate conditions
- For kitchens and bathrooms, use only BWP-grade waterproof adhesives
- Ensure adequate ventilation when using solvent-based products
- Buy from established brands—unknown local formulations often fail under stress
When NOT to Choose Standard Contact Adhesive
Avoid standard contact adhesive for acrylic laminates (use acrylic-specific adhesive), outdoor or exterior HPL (requires mechanical fastening plus specialized bonding), applications requiring repositioning (contact adhesive bonds instantly), and high-temperature environments like near ovens (use heat-resistant formulations).
Common Mistakes to Avoid in Laminate Application
Understanding these pitfalls helps avoid costly rework and customer complaints. Most lamination failures trace back to one or more of these common errors.
Mistake 1: Skipping Surface Preparation
Applying laminate on dusty, oily, or unsanded plywood guarantees weak bonding. The adhesive sticks to the surface contaminants rather than the wood fibers, resulting in peeling or bubbling within weeks. Always sand and clean both surfaces before gluing.
Mistake 2: Using Wrong Adhesive Type
Using PVA adhesive for kitchen countertops or standard contact adhesive for acrylic laminates leads to premature failure. Each laminate type has specific adhesive requirements—confirm compatibility before starting.
Mistake 3: Inadequate Drying Time
Bonding before the adhesive reaches proper tackiness traps solvents or water between layers, causing bubbles during curing. Conversely, waiting too long lets the adhesive skin over, preventing proper bonding. Monitor open time based on your specific product and climate conditions.
Mistake 4: Applying Laminate in High Humidity
Laminate sheets expand in humid conditions, particularly across their width. Bonding during monsoon without allowing proper acclimatization causes post-bond expansion and bubbling. Limit sheet width to 2 feet in high-humidity environments and leave 2mm gaps between adjacent sheets.
Mistake 5: Insufficient Pressing Pressure
Light pressing leaves air pockets that appear as bubbles after curing. Use adequate weight (minimum 100 kg for an 8×4 ft panel) evenly distributed, and maintain pressure for the full curing period.
Mistake 6: Not Applying Balance Sheet / Backing
Laminating only one side of plywood causes warping because the laminate restrains moisture movement on one face but not the other. Always apply a backing laminate or cabinet liner on the reverse side to balance stresses—this is especially critical for thin plywood (12mm or less).
Quick Inspection Checks
- Tap Test: Knock on laminated surface—hollow sounds indicate unbonded areas
- Visual Scan: Look for surface waviness, bumps, or edge lifting under angled light
- Edge Check: Run fingernail along edges to detect any starting delamination
- Press Test: Apply firm hand pressure on suspected bubble areas—movement indicates poor bond
Price Guide for Laminate Sheets in India
Laminate pricing varies significantly based on type, thickness, finish, brand tier, and regional availability. These ranges reflect typical dealer prices in Tier-1 cities (Mumbai, Delhi, Bangalore, Chennai); Tier-2 and Tier-3 cities may see 5–15% variation based on transport costs and local dealer margins.
| Laminate Type | Thickness Range | Price Range (₹/sq ft) | Price per 8×4 Sheet (₹) | Notes |
|---|---|---|---|---|
| Standard HPL (Matte) | 0.8mm – 1.0mm | ₹30 – ₹60 | ₹960 – ₹1,920 | Most common for furniture |
| HPL (Glossy) | 0.8mm – 1.0mm | ₹56 – ₹80 | ₹1,800 – ₹2,560 | Shows fingerprints easily |
| HPL (Textured/Woodgrain) | 1.0mm | ₹47 – ₹75 | ₹1,500 – ₹2,400 | Popular for wardrobes |
| Acrylic Laminate | 1.0mm – 1.2mm | ₹70 – ₹140 | ₹2,240 – ₹4,480 | High-gloss premium finish |
| PVC Laminate | 0.35mm – 0.5mm | ₹45 – ₹110 | ₹1,440 – ₹3,520 | For membrane press/edges |
| Exterior Grade HPL | 6mm – 8mm | ₹150 – ₹300 | ₹4,800 – ₹9,600 | UV/weather resistant |
What Causes Price Variation?
- Brand Tier: Premium brands (Greenlam, Merino, Century) command 20–40% premium over economy brands
- Finish Type: Glossy and metallic finishes cost more than matte or textured
- Thickness: Thicker laminates (1.0mm+) cost more but offer better durability
- Design Complexity: Synchronized textures and exotic patterns carry premium pricing
- Quantity: Bulk purchases (50+ sheets) typically qualify for 5–10% dealer discounts
- GST Impact: 18% GST applies; always confirm whether quoted prices include GST
Regional Considerations for Laminate Application
India's diverse climate zones significantly impact lamination success. What works in dry Rajasthan may fail in humid Kerala without appropriate adjustments.
Coastal and High-Humidity Regions
Cities like Mumbai, Chennai, Kochi, Kolkata, and Goa experience sustained humidity levels above 70% for much of the year. In these environments, use only BWP-grade waterproof adhesives; allow 50% longer drying time for adhesives; store laminate sheets in sealed packaging until use; acclimatize plywood indoors for 3–5 days before lamination; and apply silicone sealant on exposed edges after trimming.
Monsoon Season Precautions
Avoid lamination work during peak monsoon if possible. If unavoidable, work in air-conditioned or dehumidified spaces; limit laminate sheet width to 2 feet maximum; leave 2mm expansion gaps between adjacent sheets; extend pressing time by 25–50%; and check for air pocket formation more frequently.
Hot and Dry Climates
Regions like Rajasthan, interior Gujarat, and parts of Maharashtra experience low humidity and high temperatures. Here, adhesive open time reduces significantly—work faster to prevent premature skinning. Store adhesive containers in shade, and if ambient temperature exceeds 40°C, consider early morning or evening application when temperatures are moderate.
Metro vs Tier-2/Tier-3 Availability
Premium laminate brands and specialized adhesives are readily available in metros through dedicated plywood dealer networks. In smaller towns, availability may be limited to 2–3 brands, often with extended delivery times. Plan material procurement 2–3 weeks ahead for remote locations, and consider transport costs (typically ₹3–8 per sq ft for long-distance orders) in project budgets.
Frequently Asked Questions
What is the full form of HPL laminate?
HPL stands for High-Pressure Laminate. It refers to decorative surface sheets manufactured by compressing multiple layers of kraft paper impregnated with phenolic resin under high pressure (typically above 1,000 PSI) and heat, topped with a melamine-impregnated decorative layer. The term "high pressure" distinguishes it from LPL (Low-Pressure Laminate) or TFL (Thermally Fused Laminate), which are fused at lower pressures directly onto substrate boards during manufacturing. HPL sheets are rigid, durable, and must be bonded to substrates like plywood or MDF using adhesives for furniture applications.
Which adhesive is best for laminate sheet on plywood?
For standard interior furniture applications, solvent-based contact adhesive remains the most reliable choice for bonding HPL to plywood in India. It provides instant bonding, tolerates minor surface imperfections, and performs consistently across different temperature conditions. For wet areas like kitchen sink cabinets and bathroom vanities, BWP-grade (Boiling Water Proof) adhesives are essential—they maintain bond strength even with water exposure. Acrylic laminates require specialized acrylic adhesives for proper bonding. Always match adhesive type to laminate type and application environment for best results.
How to fix bubbles in laminate sheet after pasting?
Small bubbles can sometimes be fixed by heating the affected area with a household iron (set to medium-low, no steam) and then rolling firmly with a J-roller until the laminate cools. This reactivates the adhesive and allows re-bonding. For stubborn bubbles, make a small slit with a utility knife, inject fresh adhesive using a syringe, press firmly, and tape down until cured. However, if bubbles appear across large areas or keep recurring, the bond has fundamentally failed—the only reliable solution is removing and re-laminating the panel with proper surface preparation and adequate pressing time.
Is laminate sheet application good for kitchen cabinets?
Yes, laminate sheets are excellent for kitchen cabinets when applied correctly with waterproof adhesive and proper edge sealing. HPL provides a hygienic, easy-to-clean surface that resists heat, scratches, and stains—ideal for kitchen environments. However, the base plywood must be BWP-grade or marine plywood for moisture resistance, edges must be sealed with edge banding to prevent water ingress, and only BWP-grade adhesives should be used. For kitchen countertops near sinks, consider compact laminate or solid surfaces, as standard HPL can delaminate with repeated water exposure at seams.
What is the price difference between matte and glossy laminate?
Glossy laminates typically cost 15–30% more than matte finish equivalents of the same brand and thickness. In practical terms, a standard 8×4 ft matte HPL sheet might cost ₹1,200–₹1,500, while a glossy version ranges ₹1,800–₹2,200. Acrylic high-gloss laminates command even higher premiums, starting around ₹2,500 per sheet for basic designs. Beyond price, consider that glossy surfaces show fingerprints, dust, and scratches more prominently—they require more frequent cleaning and careful handling during installation to maintain their mirror-like finish.
How long should laminate sheet be pressed after application?
For horizontal surfaces like tabletops and counters, maintain pressing pressure for 16–24 hours minimum to ensure complete adhesive curing and full surface contact. Use stacked plywood sheets with evenly distributed weight (100–210 kg for an 8×4 ft panel). For vertical surfaces like cabinet doors and wall panels, press with a wet cloth and J-roller for 5–10 minutes initially, then apply masking tape at 2-inch intervals along edges to hold the laminate while the adhesive cures over 24–48 hours. In humid conditions or when using water-based adhesives, extend curing time by 25–50%.
Can laminate sheets be applied on old plywood furniture?
Yes, laminate can be applied to old plywood furniture if the substrate is structurally sound. First, remove any existing finish—paint, polish, or old laminate—using scraping and sanding. Fill any dents, holes, or surface damage with wood putty and let it cure completely. Sand the entire surface to create a fresh, clean bonding surface, remove all dust, and then proceed with standard lamination. Note that old furniture may have absorbed moisture or warped over time; inspect for flatness and structural integrity before investing in re-lamination.
Why does laminate sheet warp or lift at edges?
Edge lifting and warping typically result from unbalanced lamination (one side laminated, other side bare), moisture exposure at unsealed edges, inadequate adhesive coverage near edges, or climate-induced dimensional movement where laminate and substrate expand at different rates. Prevention includes always applying a backing laminate on the reverse side, sealing all edges with edge banding immediately after trimming, using adequate adhesive coverage extending to all edges, and selecting substrates (preferably particleboard for countertops) that have similar expansion characteristics to laminate. Once warping occurs, correction is difficult—prevention is far easier than repair.
Disclaimer: This content is provided for general informational purposes based on industry practices and publicly available information. Product specifications, standards, prices, and availability may vary by manufacturer, region, and time. Readers should independently verify details with manufacturers, dealers, or qualified professionals before making purchase or construction decisions.Want Plywood Suggestions?
Share a few details and a Apple Ply specialist will suggest suitable brands and connect you to responsive dealers.